How to do 10 Common Tasks in JSF 2.0
Here’s a list of 10 features you might need to implement everyday and how they are performed in JSF 2.0.
- Templating
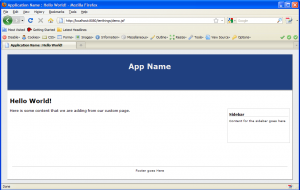
JSF 1.0 started by using JSP as the templating technology, but most people started using Facelets by Jacob Hookom and I haven’t since found a templating setup I like more. With JSP, templates work by including files, and with other templating setups you define the template to use and then each page defines the content placed in the template. JSF combines both of these and works very much like ASP.net master pages. Each template page defines areas and in each content page, you pull in the template you want to use and then push the content into the defined areas on the template. Here’s an example template file that defines our header, footer and content layout with specific named areas defined for inserting content with theui:inserttag.<!DOCTYPE html PUBLIC "-//W3C//DTD XHTML 1.0 Strict//EN" "http://www.w3.org/TR/xhtml1/DTD/xhtml1-strict.dtd"> <html xmlns="http://www.w3.org/1999/xhtml" xmlns:h="http://java.sun.com/jsf/html" xmlns:ui="http://java.sun.com/jsf/facelets"> <h:head> <title>Application Name : <ui:insert name="title">Page Title</ui:insert></title> <h:outputStylesheet name="css/screen.css" /> </h:head> <h:body> <div id="page"> <div id="header"> <h1>App Name</h1> </div> <div id="container"> <h1><ui:insert name="title">Default Page Title</ui:insert></h1> <div id="sidebar"> <h1>Sidebar</h1> Content for the sidebar goes here </div> <div id="content"> <ui:insert name="content">Default value for Content</ui:insert> </div> <div id="footer">Footer goes Here</div> </div> </div> </h:body> </html>Notice we re-use the “title” insert point in the page title and the content header. Here is an example page that uses this template :
<?xml version="1.0" encoding="UTF-8"?>
<ui:composition xmlns="http://www.w3.org/1999/xhtml"
   xmlns:ui="http://java.sun.com/jsf/facelets"
   xmlns:f="http://java.sun.com/jsf/core"
   xmlns:h="http://java.sun.com/jsf/html"
   template="/WEB-INF/templates/template.xhtml">

   <ui:define name="title">Hello World!</ui:define>
   <ui:define name="content">
      Here is some content that we are adding from our custom page.
   </ui:define>

</ui:composition>
And the result :
- Writing Code for the Page
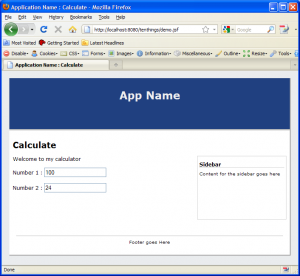
JSF pages are driven by pojo objects called backing beans that can be defined using annotations. Depending on whether you are using JCDI you will use the managed beans annotations or the JCDI bean annotations. The annotations are very similar except for the package names so care must be taken. You should use the JCDI annotations over the managed bean annotations as JCDI provides a richer set of features. Here is an example bean using the JCDI bean annotations.import javax.enterprise.context.RequestScoped; import javax.inject.Named; @Named("calculator") @RequestScoped public class MyBackingBean { private String message = "Welcome to my calculator"; private Long number1 = new Long(100); private Long number2 = new Long(24); private Long result; ... getters and setters removed ... }This bean is fairly typical in that it is defined as having a name and a scope. Whenever a JSF page evaluates the expression #{calculator}, it will evaluate to a request scoped instance of this bean. This also applies to any other Java EE components that can use EL expressions. Attributes on the bean can be bound to components on the page using the same EL expressions. Here’s an example of displaying the message and inputs for the two numbers in our JSF page.
<?xml version="1.0" encoding="UTF-8"?>
<ui:composition xmlns="http://www.w3.org/1999/xhtml"
   xmlns:ui="http://java.sun.com/jsf/facelets"
   xmlns:f="http://java.sun.com/jsf/core"
   xmlns:h="http://java.sun.com/jsf/html"
   template="/WEB-INF/templates/template.xhtml">

   <ui:define name="title">Calculate</ui:define>
   <ui:define name="content">
      #{calculator.message}<br/>
      <br/>
      Number 1 : <h:inputText value="#{calculator.number1}" id="number1"/><br/>
      <br/>
      Number 2 : <h:inputText value="#{calculator.number2}" id="number2"/><br/>
      <br/>
   </ui:define>

</ui:composition>
And the result :
- Trigger a method execution on the bean
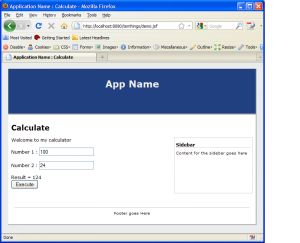
Once you’ve put in all your data, you want to send it back to the server and do something with it. To do this, we put a form element around the content, and add either a command button or link. In this case, we are going to add a button to add the numbers and display the result. Add a new method to the backing bean to add the numbers and put it in result.public void executeAdd() { result = number1 + number2; }Now we will add the button to the form and a piece of text to show the result.
<ui:define name="content"> <h:form id="form"> #{calculator.message}<br/> <br/> Number 1 : <h:inputText value="#{calculator.number1}" id="number1" /><br/> <br/> Number 2 : <h:inputText value="#{calculator.number2}" id="number2"/><br/> <br/> <h:outputText value="Result = #{calculator.result}" /><br/> <h:commandButton value="Execute" action="#{calculator.executeAdd}" /> </h:form> </ui:define> - Hiding view elements
There are many times you don’t want to render view elements depending on the state in the backing bean. This can range from a value not being set, to limitations based on user security or whether the user is logged in or not. To handle this, all JSF components have arenderedattribute which can be set to an expression. If the expression evaluates to true, then the JSF component is rendered. The rendering applies to all children as well so if one group component is not rendered, none of the children will be either. Here we will use it to hide the result message if there is no result available which is the case when the user first enters the form. We only render the message if the result is not null :<h:outputText value="Result = #{calculator.result}" rendered="#{calculator.result != null}"/> - Decorating content
Typically most content is wrapped in divs and spans that let you style the display easily, for example, data input form properties. Doing this manually for each form input control and then possibly having to change each one manually if something changes is a bad idea. Instead, we can use theui:decoratetag that lets you wrap content on the content page with other content from a template. Theui:decoratetakes a takes a template as a parameter and some content to be wrapped. Our form property template may look like the following :<ui:composition xmlns="http://www.w3.org/1999/xhtml" xmlns:ui="http://java.sun.com/jsf/facelets"> <div class="property"> <span class="propertyLabel"> <ui:insert name="label" /> : </span> <span class="propertyControl"> <ui:insert /> </span> </div> </ui:composition>
This defines our structure for the decorator template. We expect a label value to be passed in to use as a caption for the property. The
ui:inserttag without a name causes whatever content is placed in theui:decoratetag in the content page to be inserted. In our case, we want to decorate our form input components.<ui:decorate template="/property.xhtml"> <ui:define name="label">Label Text</ui:define> <h:inputText value="#{calculator.number1}" id="number1"/> </ui:decorate>Here we decorate our number 1 input box with our property decorator which surrounds it with divs which can be styled. We define the label value and pass it into the template so it can be included in the final page.
- Creating re-usable content
Another facelets feature is the ability to create re-usable JSF fragments that can be used in any page. You can even parameterize it so the data that is displayed is relevant to the context of the form it is displayed in. For example, if your entities have auditing information to display the creation and last modified dates, you don’t want to re-produce the view code for that. Instead, you can create a facelet to display that information<ui:composition xmlns="http://www.w3.org/1999/xhtml" xmlns:ui="http://java.sun.com/jsf/facelets"> Created On : #{p_entity.createdOn} Modified On : #{p_entity.modifiedOn} </ui:composition>Obviously, there would be more code in there for formatting and layout, but this page displays the created and modified dates of the
p_entityobject. This value is provided by the page into which the composition is being inserted.<ui:include src="/addModDisplay.xhtml"> <ui:param name="p_entity" value="#{person}" /> </ui:include> - Ajaxify a page.
Pre-JSF 2.0 most AJAX solutions for JSF were third party ones that each chose their own path to handling AJAX. With JSF 2.0, AJAX is now a part of the framework and can be used by developers out of the box and also allow third party developers to build their own frameworks on top of. Making a form AJAX capable just requires you to do three things. First, you must identify what data is posted back to the server in the call, then you must determine what event the call is made on, and then you must indicate what part of the page will be re-rendered once the AJAX request is complete.
In our example, we’ll make the calculation AJAX enabled by adding the AJAX tag to the command button used to calculate the result. First off, we need to add the javascript for AJAX in JSF. We can do this by adding the following at the top of the content. You can also add it for all pages in the template.<h:outputScript name="jsf.js" library="javax.faces" target="head" />
Now we will wrap the result text in a named container called
result. We will use this named container to tell JSF what we want to re-render.<h:panelGroup id="result"> <h:outputText value="Result = #{calculator.result}" rendered="#{calculator.result != null}" /> </h:panelGroup>Now we will add the AJAX features to the command button.
<h:commandButton value="Execute" action="#{calculator.executeAdd}">
	<f:ajax execute="@form" render="form:result" />
</h:commandButton>
This tells JSF we want to postback the whole form (@form is a special name) and render the component identified by
form:result. We could have used@formhere as well to re-render the whole form. These two attributes can take these special names, a single component name, or a list of component names. Since we added this to a command button, the event defaults to the clicking of the button. - Page Parameters
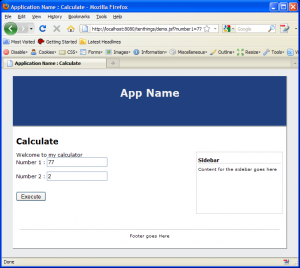
Handling page parameters with JSF 2.0 is really simple. We just add some metadata at the top of the page to bind parameters to backing bean attributes.<f:metadata> <f:viewParam name="number1" value="#{calculator.number1}"/> <f:viewParam name="number2" value="#{calculator.number2}"/> </f:metadata>If we call this page with these parameters set, the form will be pre-populated with our values.
http://localhost:8080/tenthings/demo.jsf?number1=77&number2=2
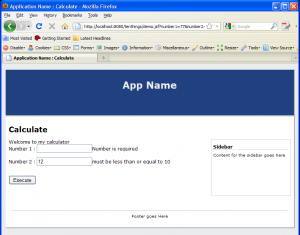
- Validate page
There are a few ways we can validate the data, but first things first, we need to add some places to put error messages using theh:messagetag to display an error message associated with a component. Here is our data entry component using the decorator and the message components added.<ui:decorate template="/property.xhtml"> <ui:define name="label">Number 1</ui:define> <h:inputText value="#{calculator.number1}" id="number1" required="true" requiredMessage="Number is required"/> <h:message for="number1" /> </ui:decorate> <ui:decorate template="/property.xhtml"> <ui:define name="label">Number 2</ui:define> <h:inputText value="#{calculator.number2}" id="number2"/> <h:message for="number2" /> </ui:decorate>In this first instance, we have validated in the view using the
requiredattribute of the input for number 1 and provided a message to display if it is blank. We can also add validations using the standard bean validations in JSR 303. In our backing bean, locate thenumber2field and add the validations you want.@NotNull @Min(value=0) @Max(value=10) private Long number2;
This makes our number 2 value required and ranged to between 0 and 10. If we try and put anything else in and click the execute button, we will get an error. Note that if you are doing this yourself, you have to open up the ajax re-render section to include the whole form since otherwise the error messages will not be rendered as they are not part of the rendered components we specified.
Furthermore, if we put those annotations on a JPA model and connect our JSF page to that model, the page will pick up the annotations from there when we try to post the values back to the model. Those same validation annotations will also be used to validate the model before it is saved into the database. Essentially, we use one set of annotations to handle validation for the database and view layers.
We can also validate using code behind the scenes and return an error , or to return a page error that is tied to a specific component. In our
executeAddevent we will check to see if number 1 is 27 and if so, we will display a warning.public void executeAdd() { if (number1 == 27) { FacesContext.getCurrentInstance().addMessage("form:number1", new FacesMessage("Number 1 should not be 27")); } result = number1 + number2; } - Optional CSS Styling
There are many times when you want to style something differently depending on the state on the server. This can easily be done by using EL expressions in the style attribute. In fact, EL expressions can be used in most JSF attributes. To change the style of some text depending on priority of an issue, you can use the following :<span class="#{issue.isUrgent ? 'urgentText' : ''}">This is not yet resolved</span>
As you can see, there are a lot of powerful things that can be done with JSF using a small amount of simple code and they all follow the same techniques and methods which can help when learning JSF.
8 thoughts on “How to do 10 Common Tasks in JSF 2.0”
Comments are closed.
It seems to me that many of these tasks (#1,3,4,5,6,10) can be done with JSF 1.2 and pre-2.0 Facelets (https://facelets.dev.java.net/) too.
Hey Craig, yes, most of these can be done with JSF pre-version 2.0. I put the version in the title since some of the features were 2.0 only.
Andy, nicely done site, I just followed the link from your linkedin post at Java EE Pros. I commented at about post# 23 about 3 months ago. Anyway I have been wanting to do a site for myself for a while and just haven’t done it yet, this is very motivational for me. Good Job!
Once common task I was hoping you would discuss was how to iterate through a set of rows. For example if I had an array list of objects representing an item (Item#, Item Name and Item Price), how do I iterate through the list on the UI and display them. I have read articles that recommend using JSTL or JSP tags but they also then proceed to say not to mix these tags with JSF. Nice post though I found it really useful.
Thanks for the comment David, that thread certainly sparked off some debate,
Kevin, you can use a data table component to iterate through the rows :
<h:dataTable value="#{myBean.myList}" var="v_item">
	<h:column>
  		#{v_item.id}
	</h:column>

	<h:column>
 		#{v_item.name}
	</h:column>

	<h:column>
  		#{v_item.price}
	</h:column>
</dataTable>
Alternatively, if you don’t want it in a table and just want to iterate through the list :
Items :
<ul>
    <ui:repeat value="#{myBean.myList}" var="v_item">
        <li>#{v_item.id} - #{v_item.description}</li>
    </ui:repeat>
</ul>
No need for JSP or JSTL tags!
Cheers,
Andy Gibson
very nice site,
i think security its a commnon task in any web application, could you put an example about jsf- security please,,
i wanna know how manage security using with login page and each other jsf pages within the app
Hey,
Sorry for the delay in replying, this week I will have a new demo application out using JSF, JPA and CDI using servlet containers and involves user accounts and security.
Cheers,
Andy Gibson
Hi,
I use to set the alignment of each column in dataTable by setting in the css file. It works for the meda=screen.
However, if I print the table, alignment is not working. When I view the pace source, found that
<link rel="stylesheet" media="screen" type="text/css" …
What should I do so that media="screen, print" ?
rgds